Details
Dougi
 Create quality JPEG images with ease. Paste in an image or drag and drop and set desired quality and save. That's it. With a WYSIWYG (What You See Is What You Get) display, see all changes in quality and image size in realtime.
Don't guess the quality required to produce a clear, crisp JPEG image, try it before you save it.
Free, fully functional, portable software program, with no installation or setup. Your existing computer libraries/files remain unchanged/unmodified. We take pride in this respect function.
Tip:
Dougi is portable and will run from within the folder you download it to.
Features
- WYSIWYG (What You See Is What You Get) display
- Preview option - view JPEG image in web browser
- Quality range 5% - 100% (view changes in realtime)
- Options: Mirror, Flip, Grey, Sepia, Noise, Invert and Soften
- Realtime Information: Dimensions, JPEG Size, Colors
- Open image formats: PNG, GIF, JPG, JIF, JPEG, BMP and TEA
- Save image formats: JPG, JIF and JPEG
- Screen Color: Default, Grey, Light Grey, Black, White, Off White and Custom
- Fit To Screen option - fit larges image to screen
- Simple and easy to use
- Fast, lightweight and flicker free modern user interface
- Portable - no installation and no alteration to your operating system
- Built-in help - view detailed information directly in program
- No Internet Required - run completely offline
- Free To Use - 100% freeware, no cost, no membership, no nags, no strings attached
Information
Name Dougi
Version1.00.190
EditionStandard
TypeDesktop Application
ClassificationFree for personal and business use
Status-
Release Date28th May 2022
PortableYes
Code Foundation4th Generation (Gossamer)
Operating System(s)Microsoft Windows 95-11 and Wine (excludes Win10s/11s)
Dougi
Version1.00.190
EditionStandard
TypeDesktop Application
ClassificationFree for personal and business use
Status-
Release Date28th May 2022
PortableYes
Code Foundation4th Generation (Gossamer)
Operating System(s)Microsoft Windows 95-11 and Wine (excludes Win10s/11s)


Name
DougiVersion
1.00.190
Edition
Standard
Type
Desktop Application
Classification
Free for personal and business use
Status
-
Release Date
28th May 2022
Portable
Yes
Code Foundation
4th Generation (Gossamer)
Operating System(s)
Microsoft Windows 95-11 and Wine (excludes Win10s/11s)
Screen Shots
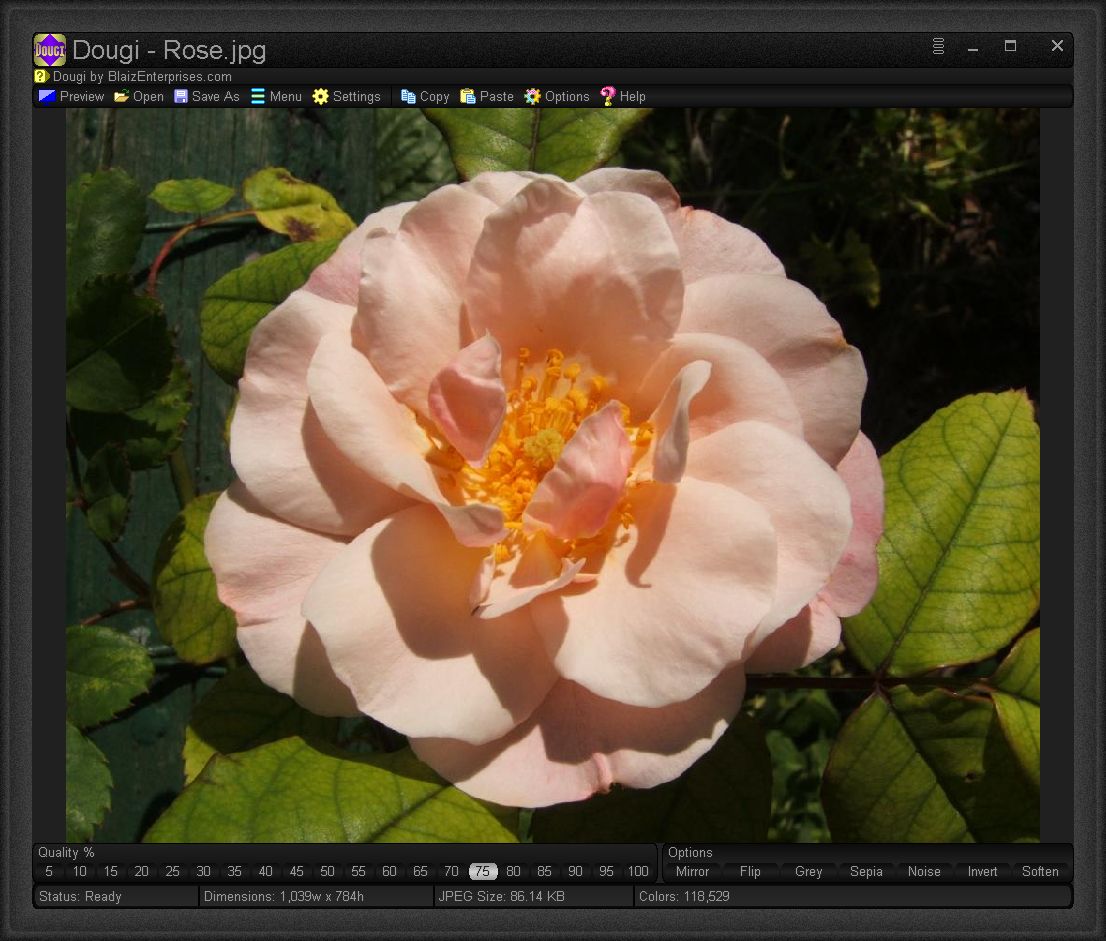
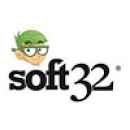
At 75% quality the image requires 86KB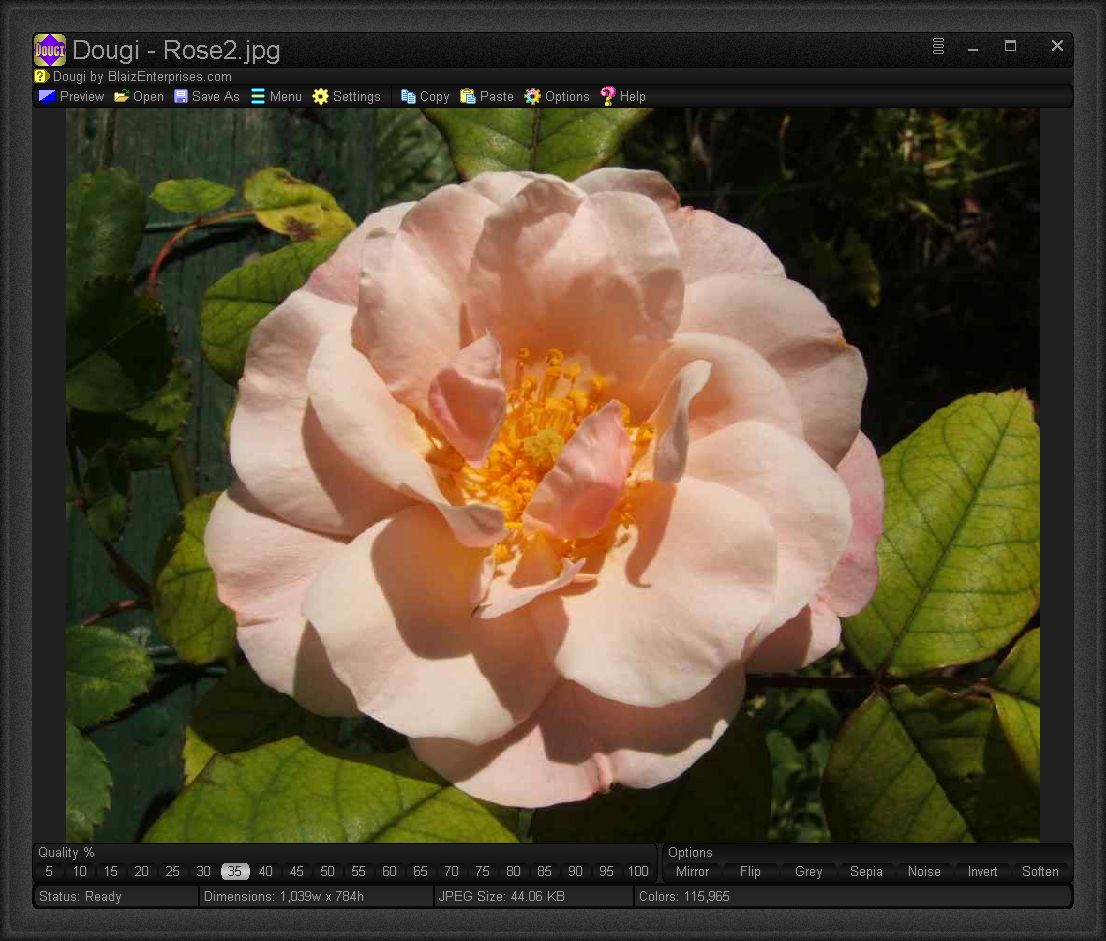 Lowering the quality to 35% still produces a good quality image but for about half the size, or 44KB
 The instant sepia effect takes only a single click or tap of the "Options" panel. So simple!
 Combine multiple "Options" together to create something unique
Help
Dougi Help Topics
AboutHelp TopicsCreate quality JPEG images with ease. Paste in an image, or drag and drop and set desired quality and save. That's it! With a WYSIWYG (What You See Is What You Get) display, you will see all changes in quality, and image size in realtime.- About
- Information
- Key Features
- Additional Program Features
- Running Dougi for the first time
- Main toolbar and their functions
- What image formats can be opened, and how?
- How to save your image to file as a JPEG
- How to create a JPEG image with the right quality for your needs
- Which images types are best for making a JPEG?
- Options explained
- Recommended maximum image dimensions
- Change the coloring of Dougi
- How to change the frame style, size and sparkle
- How to change the font, zoom factor, antialias level and size of text
- Miscellaneous Settings
- Economy mode
- What is a portable program?
- Start button and Desktop links
- On Top
- Show Splash on Start
- Show Program Folder
- Remove Dougi
- License Agreement
Don't guess the quality required to produce a clear, crisp JPEG image, try it before you save it.
Free, fully functional portable software program, with no installation or setup. Your existing computer libraries/files remain unchanged/unmodified. This is our respect function.
Tip:
Dougi is portable and will run from within the folder you downloaded to.
InformationHelp Topics
- Classification - Free
- Type - Desktop Application
- Usage - Personal and business use
- Operating System - Microsoft Windows 95-11 and Wine and Ubuntu with Wine
- Security - Anti-tamper, multi-layer and realtime aware
Homepage Page
www.blaizenterprises.com/dougi.html
Download Site
www.blaizenterprises.com/dougi.zip
Portal - Blaiz Enterprises
www.blaizenterprises.com
Key FeaturesHelp Topics
- WYSIWYG (What You See Is What You Get) display
- Preview option - View JPEG image in web browser
- Quality range 5% - 100% (view changes in realtime)
- Options: Mirror, Flip, Grey, Sepia, Noise, Invert, Soften
- Realtime Information: Dimensions, JPEG Size, Colors
- Open image formats: PNG, GIF, JPG, JIF, JPEG, BMP, TEA
- Save image formats: JPG, JIF and JPEG
- Screen Color: Default, Grey, Light Grey, Black, White, Off White and Custom
- Fit To Screen option - Fit large image to screen
- Simple, easy to use
- Fast, lightweight and flicker free, modern user interface
- Portable - No installation/no alteration to your operating system
- Built-in Help - View detailed information directly from the program
- No Internet Required - Run completely offline
- Free To Use - 100% freeware, no cost, no membership, no nags, no strings attached
Additional Program FeaturesHelp Topics
- Uniquely framed window with style, size and sparkle options
- "
 Options" window for customising the entire look and feel
- 46 built-in color schemes (Aqua Marine -> Wild White)
- 32 built-in frame styles (Classic -> Traditional 3)
- 9 built-in cursors (Orange -> White) + Custom + Default
- 11 GUI fonts (Arial -> DejaVu Serif) + Custom
- 10 customisable color schemes (Custom 1-10 / set your own colors)
Running Dougi for the first timeHelp TopicsThree sample images come built-in with Dougi: Bough.jpg, Flower.jpg and Rocks.jpg. On startup, "Bough.jpg" is displayed.
To load a different image, click the "
 Open" link from the top toolbar. An "Open Image" window will display. Navigate to the drive and folder and select the image you wish to open. Click the "Open" button. The image will load and display.
Tip:
A large image may appear smaller when the "Fit To Screen" option is turned on (ticked). To view the full image, click "
 Settings" and untick "Fit To Screen" option.
Main toolbar and their functionsHelp TopicsThe main toolbar is located near the top of Dougi's window. From left to right, it has links of:
 Preview - Display current image in web browser Open - Open an image from file
 Save As - Save image to file Save - Save image to file without prompting to replace
 Menu - Display "File/Edit" menu Settings - Display "Settings" menu
 Copy - Copy image as it appears to Clipboard
 Paste - Replace current image with Clipboard image Options - Show the Options window, to change Dougi's appearance
 Help - Show (shown as rightmost column) or hide built-in help
 Tip:
Not all links may be shown. To show or hide a link, click "
Settings" and tick or untick a toolbar option from the menu. Toolbar updates to reflect change.What image formats can be opened, and how?Help TopicsThe following image formats, color depths and modes are supported:
Portable Network Graphic (PNG):
- 24 bit color depth
- 16.7 million colors
- Lossless compression
- No transparency
- 32 bit color depth
- 16.7 million colors
- Lossless compression
- Transparency
Graphics Interchange Format (GIF):
- 8 bit color depth
- 256 colors maximum
- Lossless compression
- Transparency
JPEG (JPG/JIF/JPEG):
- 24 bit color depth
- 16.7 million colors
- Lossy compression
- No transparency
Bitmap (BMP):
- 24 bit color depth
- 16.7 million colors
- No compression
- No transparency
Text Image (TEA):
- 24 bit color depth
- 16.7 million colors
- Lossless compression
- Transparency
- A Blaiz Enterprises proprietary image format
There are three different ways to open an image:
Option 1 - Open an Image:
From top toolbar click "
Open" link, or select " Menu > Open..." to display an "Open Image" window. Navigate to the image you want to open, select and click the "Open" button. The image will load and display.Option 2 - Paste an Image:
Click "
Paste" link from the toolbar. The image from Clipboard will insert and display.Option 3 - Drag and Drop an Image:
From a Windows or Ubuntu file explorer, navigate to your image. Select and drag onto Dougi. Release. The image will load and display.
How to save your image to file as a JPEGHelp TopicsClick the "
Save As" link from the top toolbar. A "Save Image" will display. Navigate to the drive and folder you want to save your image to. Type a name for your image and click the "Save" button.Tip:
Typically the image is saved with the ".jpg" extension (JPEG Image). Click the "Format" list (bottom left of window) to display a list of alternative format extensions. Select a new format. The list will close. Saving your image will use the selected format extension now.
How to create a JPEG image with the right quality for your needsHelp TopicsDo you need to host an image with large dimensions (large width and height) on your website but consume as little bandwidth as possible? Or, do you need to present a crisp, clear version of your image and don't know how big it has to be to display properly?
Easy. First, open the image you want to check. Click "
Open" link from the main toolbar at top. Select the image and click the "Open" button.Next, select a quality (bottom left of window), in the range of 5% to 100%. Notice how the appearance of the image looks jagged and blotchy with quality of 5%. This uses maximum compression and reduces overall color and quality of the image for a small file size.
Size of the image is displayed in third information panel from left, named "JPEG Size". This reports the amount of data required to store the image, or transmit it over the internet. The smaller the size, the faster an image can be transmitted.
Now, try a high quality, for instance 90%. Notice how the appearance of the image improves significantly. Less effective compression is used, and more color and detail is retained, but at the expensive of a larger size.
Not sure which quality setting is right for your image? Go through them, one by one, starting low, like 20% and work your way up. Keep an eye on the JPEG Size and Colors reported at the bottom of the window. These are a secondary guide and help reflect your image's overall quality and appearance.
When the image appearance meets your approval, and it's size is satisfactory, go ahead and save. From the main toolbar click "
Save As" link. A "Save Image" window will display. Navigate to the drive / folder where you want to save it. Type a name and click the "Save" button.Which images types are best for making a JPEG?Help TopicsThe best kind of images for making a crisp, clear JPEG image is one with a lot of detail and colors.
A transparent image is not ideal, as the JPEG image format does not support any kind of transparency. Thus any transparent sections will be undefined, and may present with unexpected or unwanted coloring.
For best results use a 24bit bitmap image (BMP) which retains all color and detail information of the image.
A portable network graphic (PNG) also retains color and detail information. Use a non-transparent image for best results.
Or, a high quality JPEG image. This allows a possible lower quality level, whilst retaining most of the color and details of the image.
Graphics interchange format (GIF) is not recommended. These are typically low-color, and rely on GIF's ability to display sharp changes in color, which JPEG is unable to do. For instance a GIF image comprised of lines in black or red, appear sharp, but in a JPEG will appear smudgy. Even very high quality JPEG images will struggle to display such images properly.
JPEG images are best suited to landscape images, or images with a lot of gradual color change or a lot of color texture.
Options explainedHelp TopicsThe "Options" panel is located bottom right of Dougi.
Mirror - Flip image horizontally (left to right)
Flip - Flip image vertically (top to bottom)
Grey - Shades of grey
Sepia - Shades of sepia
Noise - Add distortion
Invert - Swap colors to opposites
Soften - Gently blur
Recommended maximum image dimensionsHelp TopicsWe recommend using an image of 1920w x 1080h (Full HD) or less for best results. Using a larger image than this is possible, but will typically end up producing lower than expected quality, due to internal memory and processing constraints.
If in doubt, try it and see.
Change the coloring of DougiHelp TopicsFrom the top toolbar click "
Options" link to display the "Options" window. Click " Color" link to display "Color Schemes" list.
"Color Schemes" list is comprised of three distinct sections:
- Built-In Color Schemes
- Custom Color Schemes
- Saved Color Schemes
There are 46 built-in color schemes. Select one. For instance, try "Black". The appearance changes to shades of black.
Twenty colors make up a single color scheme which determines the final appearance. Two colors govern the frame, nine for title colors (e.g. important sections - as the top toolbar and title panels), and a further nine for standard colors, for the majority of the background area.
Each built-in color scheme is comprised of it's own set of unique colors, and cannot be modified. However, a custom color scheme does allow for adjustment. To create a custom color scheme, scroll further down the list to the section titled "Custom".
Here you'll find 10 custom slots, labelled "Custom 1" through to "Custom 10". Each slot is a fully managed storage point - any changes you make are automatically saved.
To create a custom color scheme, select a slot. For instance select "Custom 1". The list divides into two separate columns. The column on the left retains the color scheme names from before, while the column on the right displays four groups of color palettes - Frame Colors, Title Colors, Standard Colors and Special Color Generators.
The first three sections are comprised of color palettes that directly represent a color in the color scheme.
To adjust a color, click the color palette to display a "Color" window. Adjust the color as desired by sliding the Red, Green and Blue color sliders to the left for less color, or to the right for more color. Or, click and drag the surface of the "Color Matrix" panel. Moving your cursor or finger within the matrix assigns the color directly beneath your cursor/finger. It is also possible to drag outside the matrix area to obtain a color from your screen.
When done, click the "OK" button to accept the color and close the Color window. The color palette updates to reflect the new color, as does Dougi.
Alternatively, click and drag the surface of the color palette to acquire any visible color on the screen. As different colors pass beneath your cursor/finger, the color palette and Dougi updates in realtime.
Save Color Scheme
To save your color scheme to file select "
Menu > Save As...". A "Save" window will display. Type a name for your color scheme and click the "Save" button. Your color scheme is saved to file and listed in the "Color Schemes" list.Use Saved Color Scheme
Scroll down to the bottom of the "Color Schemes" list to find your saved color scheme(s). To use one in particular, select it. The colors apply immediately.
Make Changes To Saved Color Scheme
Select the saved color scheme you wish to change. The column on the right displays the color scheme palettes. As before, adjust one or more colors by accessing the color palette(s).
Any changes made are automatically saved to the file on disk. There is no need to manually resave the color scheme.
How to change the frame style, size and sparkleHelp TopicsOur uniquely framed window design allows for easy resizing and recognition. A frame can be made wider or narrower and include an optional embedded random sparkle effect.
From the top toolbar click "
Options" link to display the "Options" window. Then click the " Frame" link.Choose from one of the 32 built-in frame styles. For instance "Flat". The frame updates to reflect the new style.
Some frames require a minimum size to display at their best. For "Flat" this is 32. Setting a size below this results in a hint recommending a size of 32+ be set.
A frame may have a size from 0 (no frame) to a maximum size of 72 pixels. Drag the "Size" slider right to widen the frame, and left to narrow it.
Some frames benefit from a little sparkle. Using a sparkle value of 1 or more embeds a random texture into the frame. The higher the sparkle the more noticeable the effect.
The range of a sparkle is from 0 (off) to 20 (maximum).
For a clean-cut look, set sparkle to 0.
Tip:
A sparkle of 1 or more will also embed a random texture into the window's top title bar.
How to change the font, zoom factor, antialias level and size of textHelp TopicsSupport for large text and automatic zoom for large displays is built-in. Control how much anti-aliasing (smoothing of characters) is applied.
From the top toolbar click "
Options" link to display the "Options" window. Then click the " Font" link.
Zoom
High resolution monitors, such as 4K and 8K display far more pixels (colored dots) per inch on screen than previous generations of monitors. To maintain the correct appearance of Dougi across these significantly different graphic resolutions presents a challenge.
Comparison Of Monitor Resolutions:
2K = 1920w x 1080h = 2,073,600 pixels
4K = 3840w x 2160h = 8,294,400 pixels
8K = 7680w x 4320h = 33,177,600 pixels
From above, a 4K monitor uses four times more pixels to it's 2K counterpart, for the same physical screen size. This means a program created to look and function correctly on a 2K monitor will appear smaller on a 4K monitor, technically half its intended width and height. Making everything that much smaller to view and click. And, the same program on an 8K monitor will suffer even more drastic shrinkage, rendering it pretty much unusable.
This is where zoom compensates. By default, zoom is set to automatic, making the necessary adjustments to enlarge text and images appropriately in order to maintain the expected appearance of Dougi across all monitor resolutions.
A 2K monitor needs no adjustment. But a 4K monitor requires a 2x (200%) enlargement of text and images. These are calculated and implemented on-the-fly. And an 8K monitor requires a 4x (400%) enlargement of text and images.
The end result is Dougi looks and feels the same on all monitors.
You can override the default automatic setting and specify a zoom value of 100%, 200%, 300% or 400%. This will force text and images to zoom accordingly. This may prove useful for a custom or unusual monitor resolution, for instance an ultra-wide monitor. Any change to the zoom setting takes effect immediately.
For a monitor with a resolution of 2K or less, manually setting a high zoom value may render a part or a majority of Dougi inaccessibly off screen. In this case, a special internal safety feature automatically limits the zoom to a maximum safe level.
Font Size
Change the display size of text. The default value is 10. A smaller value decreases text size, and larger values increase it.
Tip:
Not all sizes are supported by every font. In some instances on Ubuntu, selecting a large font size for Arial may cause text to look strange. If this occurs, reduce the size until the text appears normally, or use another font.
Font Name
A font name represents the font to use when drawing text on the screen. It controls what style or characters are used, and even the technology used to draw the font. Older fonts like "System" are a bitmap based font, meaning they are unable to be scaled (resized). More modern fonts like Arial can scale, making them versatile across many different sizes. The main difference is memory. Bitmap fonts use memory for each size, whereas a scalable font, or vector font (made up of mathematically calculated lines and shapes) uses a single set of instructions and thus far less memory, but at the expense of speed.
Eleven predefined font names commonly found, in the most part, on modern Microsoft Windows operating systems, and to a lesser extend on older versions, and Ubuntu Linux are presented in a single "Font Name" panel.
By default, Arial is used. It is present on almost all computer operating systems, including Windows 95 and Ubuntu.
To use a different font name, click it's name to select. The text on screen will update to reflect the change. If a font is not present on the current operating system, for instance "DejaVu Sans", would not be present on a Windows 95 operating system, a fallback font is used instead.
If you require a custom font name, then select the last option "Custom". The font name stored in this option takes affect. Click the "Custom" option again to display a "Font" window. A list of all font names present on your operating system is shown, numbered and in alphabetical order (A-Z). From this list, select the font name to be used and click the "OK" button. Text on the screen will update to reflect your change.
Font Feather / Font Specific Antialiasing
For maximum compatibility, two completely separate antialiasing systems are employed to render text on the screen.
The first is "Font Feather". A realtime, text character feathering algorithm for fonts without antialiasing. These are typically older, bitmap based fonts. But sometimes, even modern fonts cannot, or will not, support antialiasing under a specific font size. For instance, Arial on Windows drops antialias support for sizes under 14.
In this case, font feathering renders a gentle blurring of the character. A range of "Off" to "High" can be set. The higher the value, the more obvious the blurring effect.
Typically a high quality computer monitor will require only a value of "Low" for text to be presentable. Whereas lower resolution devices like TVs, which don't always honour every single pixel, and suffer from quality degradation, will require a stronger value of "Medium" or "High", for best results.
The easiest method to set the right value is to select the lowest value first, "Off" and work your way up to "Ultra" until the text appears comfortable for you, on the screen.
The second method employed is the "Font Specific Antialiasing" system. In this case, the font itself contains all the necessary information to render smooth edges to each of its characters. To use, select a value from "Dark" (use only partial information) to "Light" (make full use).
Typically it is best to try each option in turn until the text looks best for you.
Tip:
On Windows, the default font "Arial" may not support font specific antialiasing for font sizes under 14. As an alternative, try "Segoe UI", which does support smaller font sizes.
On Ubuntu v20, "Arial" does support font specific antialiasing for small font sizes.
Miscellaneous SettingsHelp TopicsFrom the top toolbar click "
Options" link to display the "Options" window. Then click the " Settings" link.A collection of program specific options to change how Dougi behaves, looks and uses resources. Each option can be easily used by selecting it with a click or tap. When an option is selected, it appears colored or filled in. To turn it off, click or tap the option again. Coloring is removed to indicate deselected.
Program Links
Start button link - select to create a Start Menu shortcut "Dougi by BlaizEnterprises.com", and deselect to remove it
Desktop link - select to create a Desktop shortcut "Dougi by BlaizEnterprises.com", and deselect to remove it
For more detailed information refer to the help topic "Start button and Desktop links".
Options
Curved Corners - Round corners on controls, menus and windows
Soft Close - Automatically close an active dialog window, e.g. Save, Open, Font etc, when clicked outside of it's window
Safe Area - Force main window to stay on screen at all times. Any attempt to drag it off the side of the screen triggers an automatic reposition at the screen's edge, ensuring the window is always accessible. Deselect this option to use across multiple monitors.
Show Splash - Display an informative/artistic splash screen on startup.
Realtime Help - Scroll useful help hints at the top of windows and menus. Help based on current cursor position or last tap position.
On Top - Position Dougi above all other running program windows.
Touch - Enlarge controls and menus for easier finger tap access.
Double Clicks - Support traditional single clicks and double clicks. For instance, double tapping or clicking the top title bar of the main window maximises the window. Deselecting this option also disables this feature.
Frame Maximised - Show the frame on the main window when maximised (using entire screen area). Deselect to automatically hide the frame upon entering maximise state.
Economy - Automatically reduces paint cycles and some CPU usage during periods of extended idleness. For more detailed information refer to the topic "Economy mode".
32bit Graphics - Suitable for all modern computers. Deselect to revert to 24bit mode, a slightly more optimised mode for older computers with lower powered graphics cards and less memory. The older machines with 24bit mode runs slightly faster, and uses a little less memory.
Minimal Scrollbars - Reduces visual clutter with a simple slider.
Large Title - Large 32px high window title bar. Deselect for the shorter 24px title.
Effects
Special Colors - Show panels and settings with specific coloring for fast, easy access.
Enhanced - Shade control surfaces for a more defined display.
Curved Shading - Use a round shade. Deselect for a linear shade.
Colorise Images - Display control images in shades of current color scheme.
Sparkle
Range 0 to 20. Increase to show more texture in the frame. Or, reduce to lessen.
Frame Size
Determines the size of the frame with a range of 0 to 72. Increase for a wider frame, and reduce for a narrower one.
Scrollbar Size
Change the size of all scrollbars with a range of 5 to 72. Larger values display either wider or taller scrollbars. Reducing shrinks their size.
Cursor
9 built-in colored cursors: Orange, Pink, Yellow, Purple, Navy, Green, Grey, Black and White. Default uses the system cursor, white on Windows and black on Linux. The custom option supports use of an external cursor, in either the static ".cur" or animated ".ani" cursor file formats.
Miscellaneous
Click the "
Misc" link (top of Options window) to display a new page of settings.Wine
Automatic (default) engages Wine related enhancements automatically, for smoother operation under Linux. Use the Enable option to force Wine support and the Disable option to turn off Wine support altogether.
Hint:
Detection of Wine is discovered by the presence of drive "Z:\".
Restore Defaults
Click or tap the "
 Restore Defaults..." button located at the bottom of the Options window to restore the main settings and options to their original values.
A program typically has more settings and menu options in addition to these that will not restore by this option. In this case, the settings and menu options may be changed by the user.
Economy modeHelp TopicsAutomatically reduce battery consumption and CPU/graphic loads on your computer with Economy mode. A short period of inactivity reduces paint requests and internal processing to ease the load on your computer's hardware, and reduce overall energy expenditure.
The first stage of economy mode activates after a short inactivity period of 30 seconds, lowering the maximum paint rate to no more than 2 requests per second.
After a continued inactivity of 10 minutes or more, the paint rate is further reduced to 1 request per second.
Internal processing may also lower, reducing the CPU load.
A single keyboard stroke, mouse click or touch will instantly disengage economy savings and return Dougi to normal operation.
How to turn Economy mode on/off:
From the main toolbar click "
Options" link to display the Options window. Click " Settings" link and select "Economy" from the Options panel to enable. Select it again to deselect the option and disable the economy mode.What is a portable program?Help TopicsA portable program is a standard program, but with less requirements in order to run. The most important difference is that a portable program does not install. This enables it to run outside the normal scope of the computer's operating system - quite simply, it is not tied down.
Typically, a portable program might reside on a USB pen stick or other removable storage media, allowing it to be transferred between many different computers. This is not possible with an installed program as it must run on the computer it was specifically installed on.
The second important difference is the ability of a portable program to carry with it all the settings and support files it requires to operate. An installed program typically relies on a central storage structure determined by the type and version of the operating system to store, track and maintain a program's settings. This is the registry in Windows - a large, library of settings and parameters organised and protected by the Microsoft Windows operating system. On Linux, it is often a collection of predefined system folders, each with a specific type of function/purpose.
Without these, a portable program is solely responsible for the maintenance and organisation of it's settings. For this reason a higher level of understanding and coding diligence is required. A portable program can be thought of as a special kind of software program.
A portable program may well be more difficult to code, but the advantage of not being tied to any one specific operating system or computer can be quite significant. From the convenience of having your program and data with you, to the greater privacy for those with a focus on security.
Our portable software programs are engineered exclusively "in house", with no third party add ons, plugins or additional DLLs. We believe in creating reliable, secure and lightweight code in order to produce efficient, powerful and simple to use software. Our engineering is designed to remain inconspicuous so that every program we build can be used with ease and simplicity.
Our definition of a portable program:
- No Installation - no additional DLL libraries or alterations to your operating system
- No Setup - run and use the program immediately
- No Registry Modifications - no changes to behaviour of your computer
- No Zipped Folder of Contents - no need to unpack a "zipped installation folder" to run
- No Specialised Hardware Requirements - a typical modern computer is sufficient
- No Specialised Software Requirements - no need for Direct X or .NET in order to run
- No Internet Required - no need for additional downloads, addons, or an internet connection to run or view documentation
- No External Help - integrated help displays inside the program, no need for help on disk or help on the internet, and no need for a web browser or text editor to view
- Self-contained - program comes with everything it needs, including any sample files etc
- All settings and support files stored in a sub-folder "Blaiz Enterprises" directly alongside the program EXE
- Consistent operation, behaviour and display over many different operating systems
- High Level of Backwards Compatibility - able to run on older hardware and operating systems, e.g. Windows 95/98
- Multiple Input Support - mouse and touch support for interaction on desktops, laptops and tablets
- Small Footprint - typical program size of ~1.2 Mb
- System Independent Code - Our 4th Generation Code Foundation utilises custom built dialog windows (Open, Save, Color, Options, etc), custom GUI rendering engine, custom window rendering and management subsystem, and custom graphics subsystem, empowering our software to run well across many different operating systems, including non-native systems such as Ubuntu v20 (via the use of Wine).
Tip:
Even though a program is portable, sometimes a change is made to the host computer. For instance, selecting the option "Desktop link" or "Start button link" from the "
Options > Settings > Program Links" panel will create a shortcut file (a file with the extension ".lnk") on the computer. This is a function of the computer and is the exception, not the rule. By default, both options are not selected (off).Start button and Desktop linksHelp TopicsBy default, Dougi does not place a link on your computer's Start button or Desktop.
To place a link on your Start button:
Select "Options > Settings" and select "Start button link". Dougi is now on your Start button as "Dougi by BlaizEnterprises.com". Click this link to run Dougi.
To place a link on your Desktop:
Select "Options > Settings" and select "Desktop link". Dougi is now on your Desktop as "Dougi by BlaizEnterprises.com". Click this link to run Dougi.
To remove link from your Start button:
Select "Options > Settings" and deselect "Start button link". Dougi is now removed from your Start button.
To remove link from your Desktop:
Select "Options > Settings" and deselect "Desktop link". Dougi is now removed from your Desktop.
On TopHelp TopicsWant Dougi to sit above other programs? Select "Options > Settings" and select "On Top" option. Dougi now has priority and sits atop all other programs and windows. To turn this feature off, deselect "On Top".
Alternative:
Click the
 button (top right of window) and click "On Top" option to toggle on/off.
Show Splash on StartHelp TopicsOn startup Dougi pauses momentarily to display an artistic splash screen. This feature can be turned off. To turn off, select "Options > Settings" and deselect "Show Splash" option.
Show Program FolderHelp TopicsCan't remember where you put Dougi? No need to worry. From the top right of the window click the
button and select " Show Program Folder". A Microsoft File Explorer folder window will display with the Dougi program (EXE) listed inside.
Remove DougiHelp TopicsDougi is 100% portable and does not install onto your computer, or alter or adjust the operation of your computer. Since there is no installation, there is no uninstall option. To remove Dougi from your computer/disk, the process must be done manually.
Note:
Before you remove Dougi, ensure both the "Start button link" and "Desktop link" options under "Options > Settings" are both deselected.
Due to the complex nature of security protocols under modern day Microsoft Windows' operating system, if these links are not removed by the program that created them, e.g. Dougi, they may linger/persist.
From Dougi click the
(show program menu) button at the top right of the window and select " Show Program Folder" option. A folder will display with the Dougi program (EXE) listed within it. Typically Dougi will have the name "Dougi.exe".Close any instances of Dougi that are running. Right click the EXE file and select the delete option. If prompts appear, confirm your intention to delete.
Dougi is now removed from your computer/disk.
Note:
A shared folder of "Blaiz Enterprises" is automatically created and maintained by Dougi during it's normal operation. This folder is responsible for holding settings, files and associated data for Dougi. It can also be used by other Blaiz Enterprises' programs located in the same folder as Dougi. If there are no other programs (EXEs) in the folder, it is safe to delete the "Blaiz Enterprises" folder. Right click the folder and select the Delete option. If prompts appear, confirm your intention to delete.
Dougi's data is now removed from your computer/disk.
License AgreementHelp TopicsCompany name and all software products contained on our websites are the intellectual property, copyrights and trademarks of Blaiz Enterprises.
All title, copyrights and intellectual property rights in and to the software product and content, and any copies thereof, are the property of Blaiz Enterprises.
License:
Blaiz Enterprises grants to you the right to use the software product. You may not reverse engineer, decompile or disassemble the software product. Any alteration or attempt to alter the original software product will cause a fatal error to occur and the product to become dysfunctional.
Indemnity:
Any use of the software product is at your own risk. Blaiz Enterprises disclaim all warranties and conditions, either expressed or implied. In no event shall Blaiz Enterprises be liable for any special, incidental, indirect, or consequential damages (including, without limitation, damages for loss of business, profits, business interruption, loss of business information, or any other pecuniary loss) arising out of the use of or inability to use the software product.

